MIL-PRF-15624G
APPENDIX A
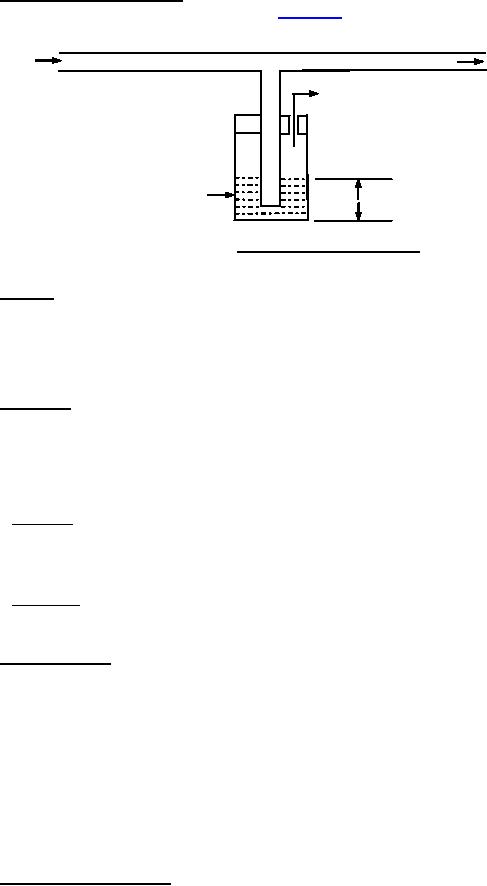
A.2.5 Initial leakage point apparatus. An apparatus to determine the initial leakage point of the specimen shall
consist of a 1 psi (7 kPa) air supply such as illustrated on figure A-4, which can be taken from the main air supply.
AIR
TO JIG
VENT
MERCURY
2"
FIGURE A-4. Initial leakage point apparatus.
A.2.6 Air oven. A conditioning air oven capable of maintaining the specified temperature and of sufficient size
to hold the indenting device will be required. The air oven shall be provided with proper temperature control to
maintain the specified temperature within a permissible variation of ±3.6 °F (±2 °C). Satisfactory circulation of the
air shall be secured by means of a fan.
A.3 TEST SPECIMEN
A.3.1 Preparation. The test specimen shall be a cylindrical disk 0.485±0.015 inch (12.5±0.5 mm) in thickness,
cut from the vulcanized rubber part or from a test sample if the part is unsuitable. A sharp, circular die having an
inside diameter of 1.129±0.001 inch (28.68±0.02 mm) shall be used. In cutting the specimen, the die shall be
suitably rotated in a drill press or similar device and lubricated by means of soapy water, so that a smooth cut
surface having square edges is obtained. The cutting pressure shall be kept sufficiently small to avoid "cupping" of
the cut surface.
A.3.1.1 Thickness. When necessary, the specimen thickness shall be reduced to the required thickness by
cutting with a sharp knife and carefully buffing to size within the permissible tolerance. The buffing shall be done
lightly to avoid overheating and care shall be taken to keep the circular faces parallel and at right angles to the axis
of the cylinder.
A.3.1.2 Combining. If necessary, the test specimen may be made of two pieces essentially equal in thickness.
A.4 PROCEDURE FOR INITIAL PRESSURE SEALING
A.4.1 Zero sealing point.
a.
Make the zero point measurement after inserting the test specimen all the way into the specimen holder and
placing the latter in the indenting device.
b.
Adjust the indenting device until the test specimen just contacts the indentor.
c.
Cover the surface of the specimen with water or alcohol, and connect the indentor to the 1 psi (7 kPa) air
supply.
d.
Further adjust the indenting device until the initial leakage point is that point at which a leakage occurs at a
rate of one bubble in 10 seconds at 1 psi (7 kPa) air pressure. Record the initial indentation reading.
e.
Back the indentor off and repeat the procedure. If a second adjustment falls within 0.01 mm (0.0005 inch) of
the first, it shall be considered satisfactory. If not, repeat the operation until two successive adjustments
check within 0.01 mm (0.005 inch).
A.4.2 Indentation of test specimen. Indent the test specimen to 0.0625±0.0005 inch (1.59±0.01 mm), by
adjusting the indenting device. After the indentation, allow the specimen to rest for 30 minutes prior to the
determination of the initial sealing pressure.
11
For Parts Inquires call Parts Hangar, Inc (727) 493-0744
© Copyright 2015 Integrated Publishing, Inc.
A Service Disabled Veteran Owned Small Business